Building the Billington Canoe
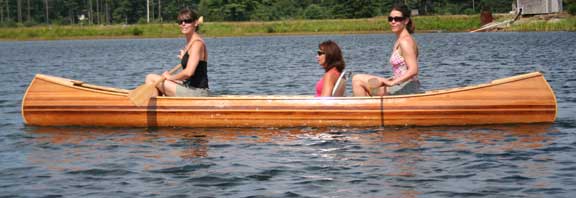
I decided to give a small chronicle of the building of the family canoe Billington. When I designed this boat and generated the canoe plans it was by request for a family friendly canoe that would simply give a day of fun on flat water and would allow for the cooler, the dog, the kids and anything else required for a day on the lake without having to worry about getting wet unless it was a choice. Though on the surface this seems like a simple request, these canoe plans proved to be a design challenge.
 Designing a flat bottom tub that simply supports weight and won't tip over is easy. Designing a canoe that will paddle well, controls with relative ease, allows the riders to sit high and comfortable and allows for the possibility of the dog jumping out and the kids following is less easy.
Finally , we are not in the business of making designs that do not look good or are not buildable by our customers. So at every point in the process we were constantly reviewing if we were achieving all of the criteria. In fact, the final result you see here was not the first attempt to achieve all of these goals. Canoe Building is a simple enough thing to do, however designers can make canoe building much harder if they are not specifically paying attention to the home builder. I know that I could build a canoe from a table of offsets scribbled on the back of a napkin, however it would be foolish to send that napkin out to our customers and expect any reasonable result.
After a number of design changes and on the fly modifications, the resultant Billington was something that we are particularly proud of. This boat has been built a number of times now with great success and we could not be happier.
The following is an abbreviated journal of the building of the Billington. I cannot recommend strongly enough that if you are attempting to build this or any of our canoes that you purchase a plans package which includes the DVD set. The DVD is over 3 1/2 hours of technique and styles, this journal simply attempts to reinforce and stress a couple of the concepts in the DVD.
Stripping the Parallel hull
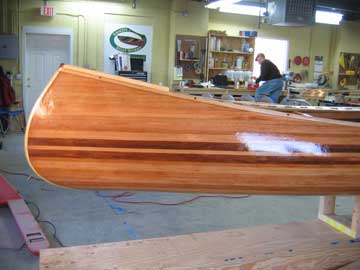
 In general this canoe strips like any other, however, in order to give style and grace to the design, we incorporated tumblehome which goes all the way to the gunwales from one end of the hull to the other. So, although you could certainly strip the hull as shown in the DVD, in this journal we show a slightly different method which rather than following the sheer line, we strip parallel to the waterline and fill in at the stems to achieve the look you see here. Stripping this particular boat in this particular method actually makes the entire process go smoother as it takes out most of the compound curves you would otherwise have to make with the strips.
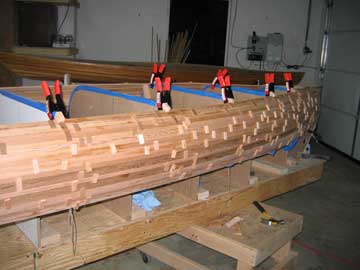
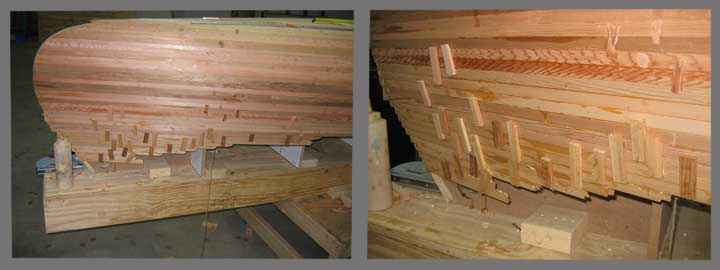
 You will note all of the small glue blocks on the hull. This boat was built without staples and if you wish to see how that is done you can find an article here covering the concepts. In an effort to not be redundant we won't cover those concepts here. The picture to the right shows the hull striped to almost the top of the stem piece. As you can see, the strips are parallel to the waterline which leaves a gap on the sheer line which starts out small and gets larger as you get closer to the stem. There is really no hard and fast rule on how to accomplish this but there are a couple of suggestions which will help you out.
First, Wherever you land on one end of the boat you should land on the other end of the boat if you are trying to accomplish a look which is symmetrical on each end. In other words, if you want the back of the boat to look like the front of the boat then make sure the strips end at the same height on the stem forms. They don't necessarily need to be parallel with the waterline however it makes it easier to eyeball. If you don't trust your eyeballs then it is easy enough to calculate the actual height off the strongback that the strip needs to be. Simply measure the height of the sheer at the center form or take the number from the table of offsets supplied with the canoe plans and patterns and transfer that to every form and you will be exactly parallel.
Filling in the sheer line
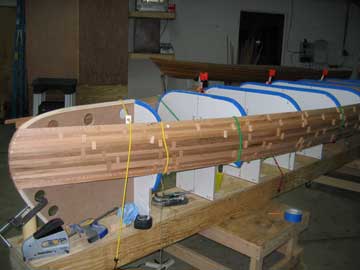
Now that we have set ourselves up with a parallel line we can go back and fill in the gaps. I am going to recommend that you use glue blocks and hot glue here as I believe the results are better, however if you want to use staples you can certainly do that I would simply offer that you should only do a couple of strips at a time, give the glue a chance to dry (a couple of hours), and then you can come back and do a couple of more strips. the reason for this is you will have less forms to use as a guide than you do for a full strip and it is easier to manage if you only do a couple at a time.
However if you are using glue blocks you can tackle the entire project at once. Me being the impatient person that I am, I don't like to stop unless it is quitting time.
As you are filling in and making the decision as to how far down the boat the strip needs to travel, keep in mind that it is better to go long than to find out you were too short when it is time to cut the sheer line. Remember that you can always cut it off but sometimes it is damned inconvenient to put more on.
Stripping the Bottom
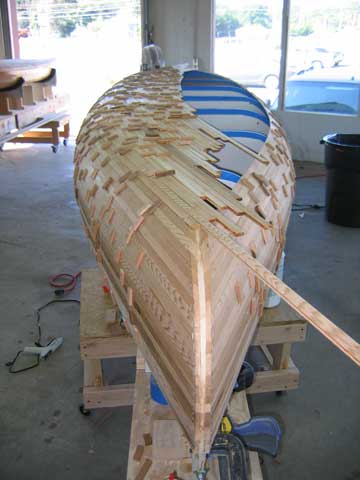 Again, I don't want to go over concepts which are covered in depth either in the DVD or on other journals and articles on this site, however I though a couple of pictures of the bottom and how the stems attach may be in order simply as a point of reference as you are stripping your Billington. As you can see from the pictures we choose a simple half lap for the bottom which means once you reach the top of the stem you strip one side past the center and come back and cut a center line. then it is a matter of filling in the other site. I admit that this is my favorite method because it is fast efficient, and easy to do. However if the artistic spirit hits you and you want to make a design on the bottom as simple as a herringbone or as complicated as a checkerboard, this is a fine boat to do that on as you have a large flat canvas to work with. Don't let my need for speed stop you from doing what you want here.
What I do want you to notice here is how far down the strips come on the stem. Because the bottom of this boat extends so far forward, I have chosen to cut the strips so that the outer stem will be considerably shorter than the inner stem. the canoe plans do not specifically state where this point is as it will move a bit depending on how you stripped your hull. It is far more important that you understand the concept to make an informed decision. Sometimes canoe plans can contain too much information and get you into trouble.
Cutting for the outer stem
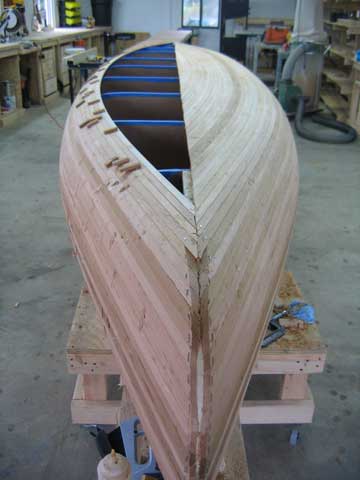 This next concept is covered in the DVD which we definitely recommend you purchase with the canoe plans, however builders get a bit skittish on this boat because the stem is so dramatic. When you are shaping your stem, the concept is to simply make it so that when the strips hit the stem they lie flat with a good glue surface. There is no place for creativity here, simply meet the objective. On this boat however because of the design of the bottom goes so far forward, the bottom strips actually travel up the stem a few inches as opposed to say the Companion canoe where the bottom continues to angle even after you have run out of stem.
Don't let this throw you. Simply pick the spot on the stem where the strips lay flat and when shaping of the stem is no longer necessary you have reached the bottom of the boat. This point will vary a little depending on where you started your strips. Assuming you have stripped your Billington the way we have here, the actual stem flattens out about 12 inches or so from the last form. You can see this clearly in the picture in the previous topic on stripping the bottom. I did it this way because I like the outer stem to dissapear into the hull. I made the decision not to put a keel on this boat until it was water tested and determined that it needed one. That turned out to be a good decision as the canoe in fact turned out to not need one which is why the canoe plans do not call for one.

