Spiling and it's application
Spiling, Yup, it is a real word... First, A little History
Spiling is one of those things I can write about, be completely wrong and nobody can prove it. I could not find a definition in most dictionaries I checked, articles I have read on it are brief, non-descript and single focused and boat building books going back to the masters of the likes of Howard Chapelle, leave enormous room for interpretation. I think the reason for this is because most people try to define spiling as a specific action instead of a goal. Even as I write this article, the spell checker refuses to accept the word.
I have been building for many years and had never given it much thought until someone asked me to explain spiling to them and I found myself giving what seemed like a never ending explanation. After a few minutes into the discussion, I realized that the discussion wasn't going to end anytime soon because I kept coming up with new techniques to discuss. Although it was always clear to me what I was doing when I spiled a plank or a stem it never occurred to me that spiling is an objective, not an activity.
When I engage in the act of spiling I may be using specially made blocks, lattice work made of soft wood and got glue, a compass or a batten. In each case, the goal is the same. It is to replicate a curve on a plank to fit either up against the keel, another plank, a stem or any other curved surface. In fact I often find myself using the words spiling and scribing interchangeably. During the research for this article, I found myself in good company. In fact if I may quote what I consider to be the bible of the trade, Boat-building by Howard Chapelle, on page 232 in the first paragraph he describes spiling and scribing as practically the same operation. Unfortunately he never goes on to delineate between the two operations anywhere in the book as far as I could tell.
So here is the bottom line. In boat building, spiling is the act or goal of using whatever you need to use in order to transfer or define a curve on a piece of wood to fit up against another piece of wood. Someone a couple of hundred years ago in a boat shop either didn't know what to call this act or got tounge tied while trying to say the word scribing and spit out the word spiling and it stuck. I defy you to prove me wrong with any historically appropriate work. Just so that we are on the same page, for me the word pre-historic as it relates to wooden boat building is defined as before fiberglass and epoxy.
Spiling techniques
 Now that we have that out of the way, and even if you disagree with the definition, I am sure we can agree on some techniques. Let's take a look at some areas we would spile to get a curve.
Spiling a curve using a compass (the common mistake)
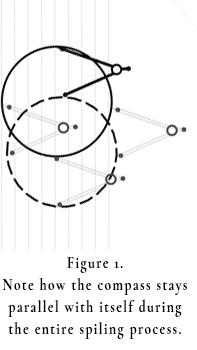
This is one of the most simple of spiling or scribing operations, yet it is also the victim of common error. Although the error is easy to make it is difficult to describe but let's give it a go shall we? When scribing a curve with a compass it is the tendency of the person doing the work to keep the compass perpendicular to the tangent of the curve at every point along the curve. This will cause a wider curve than the original. What you want to do is pick a single point on the curve to start and keep the compass parallel to itself at every point along the curve. I know that is a whole lot of high school math to recall but it is really a rather simple concept which is better described in the form of a graphic. In fact, it is best illustrated in the extreme by scribing an entire circle.
In figure 1, we keep the compass parallel with the tangent of the curve at every point on the curve. You will note that we come out with a perfect circle, however it is far too large and in fact is a scaled up version of our original circle.
Although the fix for this is easy, I will admit it isn't very intuitive unless you are used to doing this kind of stuff. Pick a point anywhere along the circle or curve and keep your compass parallel to itself during the entire scribing or spiling process. As you can see from the second graphic, this method gives you a perfect circle which will fit right over the original.
Of course we are only using a circle to illustrate the extreme case, however it proves the point well don't you think?
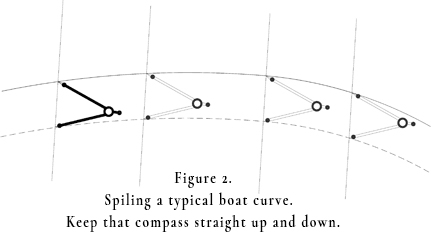 In figure 2 you can see we perfomed the same operation on a typical boat curve and the prinicipals remain the same. Once you have started scribing the curve, the only trick is to keep that compass perpendicular during the entire operation. as you can imagine, if the compass leans one way or the other it will completely change the distance from the plank you are spiling and the result will be less than satisfactory.
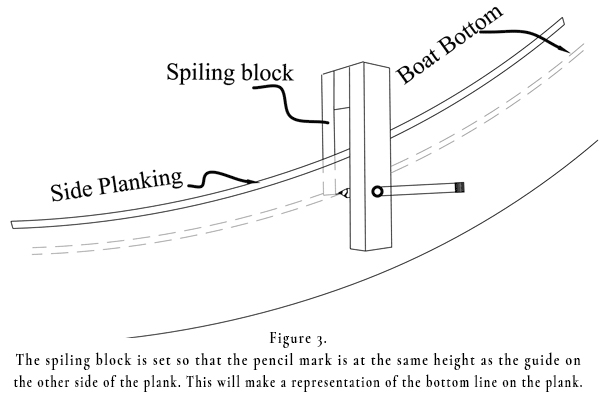
Spiling the side planking to the bottom of a flat bottom hull As with most everything on this site, there are people who will argue with the value of this technique. My defense of doing this is as follows. When I fit a plank or panel to the bottom of a boat it is quicker and more accurate for me to rough cut the plank, glue and screw into place and when the appropriate time comes spile the line of the bottom to the plank, cut close with a circular saw and finish it off with a block plane.
 I just used this technique on an 18 foot power dory two weeks ago and from the time I put the spiling block in my hand to the time the plank was finished off was about 1 hour. The other subtle advantage to this method is the waste above the bottom planking is a great place to hook a clamp as needed. As for accuracy, it was perfect.
So here is the deal. Using a spiling block as shown in figure 3, and putting the pencil in the hole which corresponds with an even line, simply place one side of the block so that it slides alone the bottom and use the pencil to trace the line on the oustide of plank. Simple as can be. Now pay attention here, because this is important. When cutting the line make sure of two things. Make sure that the saw depth is set no deeper than the depth of the plank or panel and be aware of the angle of the saw as you cut so that you don't cut too deep on the inside of plank. Remember that you are not trying for a final cut here, you are trying to get it close (say within 1/4"). With a reasonably sharp block plane that 18' panel was perfectly flush with the bottom in about 20 minutes without breaking a sweat. Just so that you know though, the amount of sweat produced is generally directly proportional with the dullness of your block plane.
Spiling a plank to the sheer or knuckle of a boat.
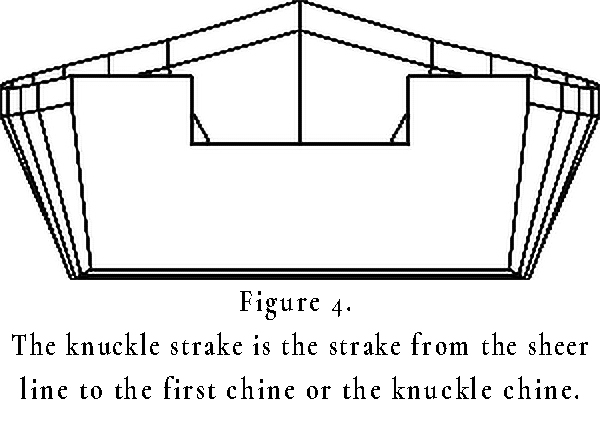 Illustrated in figure 4, a knuckle is typically defined in boat building as a chine just below the sheer where the angle of the side of the hull becomes perpendicular to the waterline though not necessarily perpendicular. Note the diagram. Really it is simply a chine and for the most part it is a handy way to extend freeboard of a boat without making the boat wider. I have used it in a few designs and it works out well. For instance if you are putting in a self bailing cockpit and don't want your knees above the sheer, a knuckle with do the trick.
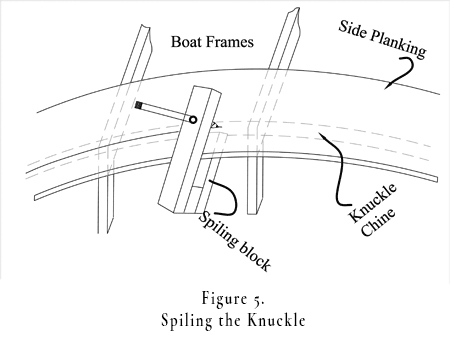
This process is virtually identical to the previous process with one notable difference. You need to set your pencil for a depth that takes into account the difference in space from the top of the knuckle batten to the actual knuckle. Don't stress, here is a picture to show you what I am talking about. There are two things to consider here when making this mark and before cutting. If you are making a lapstrake or clinker built boat then the line is less critical than if you are butting the two planks together. Even so you should strive to get very close here as it will make the next step far easier if you are not beveling and fairing at the same time. Assuming it is a clinker built boat then after you cut the line as the knuckle, the next step is to get that plane out again and plane the edge of the plank parallel with the cheer side of the knuckle batten.
 If you are building a boat where the two planks butt together then really take your time and be sure that the pencil depth is set appropriately and the saw is true to the line. When you pay attention to those two items you will find yourself ready for the next plank as soon as the saw spins down. (Ok, maybe a little sanding and chiseling)
Spiling a Lapstake plank to another plank
There is a reason why I left this one for last. First because there are a number of ways to accomplish the task and people are generally passionate about their preferred method and second because it is the most time consuming and difficult to teach. Once it sinks in though it is as simple as all the rest. there are basically four ways of spiling a one strake to another. the first was described in the discussion above concerning knuckles. The second, and third method are very traditional and require a different kind of spiling block or a compass. the last method is more modern and essentially builds a mock plank by making a truss from small scraps of flexible softwood and some hot glue. All of these methods work, I have used them all and don't really have a preference one way or the other. Making a truss is typically the most accurate and if carefully done you can nail the plank with the first try. The other methods are just as productive and typically faster once you get the hang of them. Therein lies the rub. You must be willing to make some mistakes and learn in order to master them. I did my schooling using cheap 1/4" Luan plywood. At $10 a sheet or so I could afford to make some mistakes. In face using Luan as a spiling plank is a good way to get the job done. So let's take a look at each of these methods.
Spiling with a compass.
It's really quite simple if you follow these steps. you will need a spiling batten (or plank) wide enough to trace the entire curve and flexible enough to wrap about the hull. Again, 1/4" Luan plywood works well here. Rough cut the batten to follow the outline of the previous plank or rabbet, don't worry about getting too close, we are about to take care of that.
Tack the batten to the frames using a dabs of hot glue or small paneling nails. Make a tick mark at every frame parallel with the frames and spanning both the plank already in place as well as the spiling batten. Set your compass deep enough to span the widest gap between the planks. Then at every interval, draw an arc from the edge of the fitted plank to the batten. Now it is a simple matter of taking the spiling batten down and using another thin batten to draw the curve from the tangent of the peak of every curve. When you are done you should have a spiling batten that fits right up against the previous plank. this spiling batten is used to make the curve on the plank to be fitted.
Here is another trick for you if you feel this was too easy. If you make the tick mark span the entire length of the plank and take into account the desired depth of your laps, you can take a measurement from the plank in place to the peak of the next chine and have all the dimensions you need to finish off your plank.
Using a spiling block.
This method is not dissimilar from the compass method in that it measures distances from the curve being spiled against to a spiling batten. The difference is that you use a block which travels along the given curve along the spiling batten which will trace the curve along the entire length of the batten. The good side of this method is that it is very quick to come up with an accurate curve. the bad side to this technique is that it is probably the most difficult to get the hang of and definitely requires some practice. The concept itself is easy enough and maybe the easiest to understand. However the actual execution can be problematic for some. There is only one trick here and that is to keep that spiling block parallel along the entire length of the batten. Once you have that mastered, you will be the fastest spiler (one who spiles, I just made that up) in your neighborhood.
Well there you go. If you can master all of this you are a master spiler (there's that word again, think it will catch on?)

