Building a Dory Skiff Boat
Starting with the Frames
 Hopefully this blog will take you on a boat building trip with me as I build an 18' power dory skiff. The construction method is unique using plywood planking over frames. I considered building this boat using stitch and glue but as in most cases on boats of this size, I found that the panel size would be daunting and by the time I was done installing all of the supports I needed for the self bailing cockpit, engine splash well, decking and so forth I might just as well built it with frames to begin with.
Having built using both methods, I simply find this construction method suites me far better than stitch and glue for large boats such as this. I will typically either be working alone so trying to stitch 20 foot plywood panels is a daunting task to say the least. Using frames I find that I can hang the planks with little assistance, though another pair of hands is very useful and appreciated.
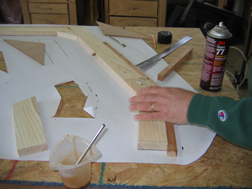
So it all starts with the frames. For this project, I used full sized patterns for frame templates and it worked out perfectly. There is an article here on this site describing the steps of using patterns to build frames. You can find it here. Take a few minutes to check it out.
It took about 8 hours to make all of the frames for this boat using patterns. Probably could have done it faster but I was in no rush.
Stems and Transoms
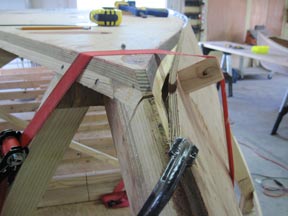
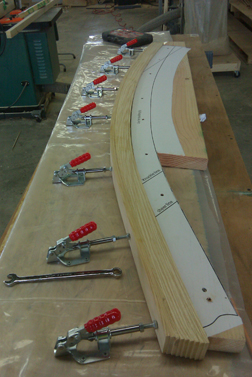 Back in the shop and working on the stem and transom. The stem configuration I chose to use was a laminated stem. This stem consisted of 10 pieces of 1/4" ash laminated using epoxy and wood flour. It took longer to set up the jig than it did to actually glue up the stem. The total glue up for the stem was about 2 hours with most of that being the jig. The clamps being used here are push rods and they cost about $10 a piece if you look for a deal. It makes quick work of this glue job. I have a bunch of them hanging around that I use for everything from table saw and router jigs to glue up jobs.
 While the stem is drying, I moved on to the transom. I had a full size pattern for this job but it was just as easy to take the measurements off the pattern and transfer them to a piece of 1/2" marine plywood. I used the pattern to make the trim pieces. the trim you see is ash again.
Again, more clamps. These are spring clamps which cost about $1 a piece at the big box stores. I keep a box full of them around and it seems like I could always use more. Epoxy glue is applied to both the trim and the transom for the glue up. You can see it here because I already took it off but before I start the glue job, I use blue painters tape to line out the boards. That way when the epoxy squeezes out, it is easy to clean up and when the tape is pulled it leaves a nice clean line.
Spring clamps do the job with epoxy, however if you are using a different kind of glue you should check to see the recommended clamping pressure.
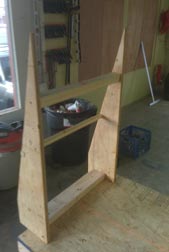
I need a strongback
 Today is full of more prep work. I need to finish up the stem and build a strongback. A strongback is simply the building jig used to build the actual boat. The boat building plans typically have a recomendation and the one for this boat is pretty simple.
First, the stem. Now that the glue is dry, I can back off the clamps and finish up the other pieces. This stem has a foot that needs to be added to attach to the keel. It is a simple process and the entire stem build is outlined in an article you can find here. Once put asside to dry, it is on to the strongback.
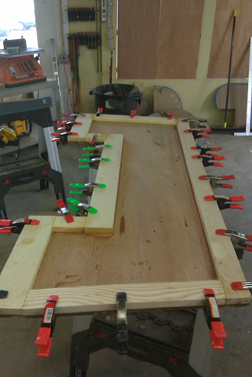
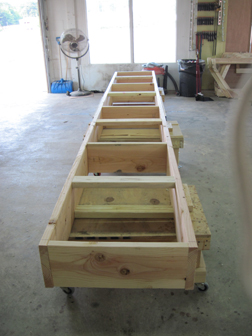
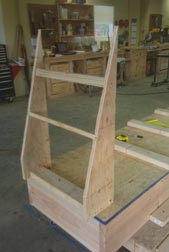
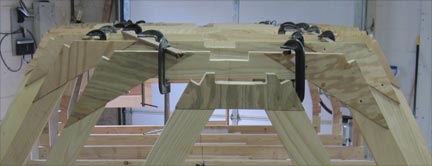
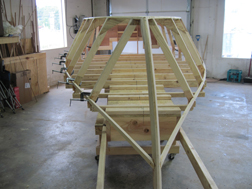
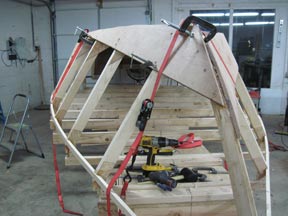
The strongback for this boat is a simple box type as the boat is built upside down. Each of the frames have a temporary cross member on them if everything is done right, the cross memebers when mounted on the strongback will put the frames at just the right height.
 the only thing special about this jig is it is built on wheels. We do that with all of our boats so that we can roll them around when we need to. I find this invaluable for keeping the shop clean and typically we have more than one boat going at a time so when we need a little more room we simply roll a boat off to the side. the only trick here is to make sure the wheels you use are rated for the finished weight of the hull. Typically a decent $15 wheel will hold up to 1500 lbs.
LINES, LINES, LINES
The strongback was finished with a 2' wide plank of pressed board on the top and braces on the sides of the platforms to make sure the strongback does not slide off the supports. We snapped a chalkline down the center of the boat building jig and all the frames and stem are ready to be mounted.
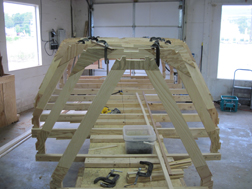 Mounting the frames is an exercise in precision. the more carful you are lining them up the easier the boat will be to build. Basically it works like this.
Centerlines everywhere!
 You will need to put blocks at every frame location to screw the frames to. Each of these blocks should have a center line on them so that you can match them up with the centerline on the boat building jig. Each frame has a temporary mounting member, they should have a centerline on them to match up with the centerline on the building jig and frame mounting blocks. the top of the frames should have a centerline on them. We will talk about how they work later.
 If you are carful about first marking all the centerlines and then mounting each frame to the centerlines, it will bring you a long way to setting up the boat skeleton. After the frames are mounted you will have to mount the strongback before you do your final aligning. The reason for this is that there is a special mounting jig needed for the transom. More than likely, there are plans within your boat plans for the jig to mount the transom. It will take into account the rake of the transom as well as the mounting height. For this boat is is a fairly simple rig with two sides and a bottom with a crossmember in the middle to spread the sides. There is also a notch in the jig with another cross member on it which meets up with a temporary brace on the transom. If all is done right, it is a simple matter of sitting the transom on the crossmember and tacking it down.
I tacked the transom down using hot glue. A couple of dabs on the top of the jig and then I mounted a couple of blocks to the side of the jig with screws and hot glued them to the transom as well. The reason I used this method was to make sure that I didn't need to put any screws into the transom.
Assuming the jig is built, mounting everything should take you less than an hour. We still need to align the frames though because this is a flat bottom boat.
Lining up the Frames
 Because this particular boat is a flat bottom boat it is fairly easy to align the frames and lock them in place. The boat plans give the height above the building jig. I find it easier to use a yard stick than a tape measure for this part. Simply measure up from the strongback to the top of the frame on each side and using shims, raise the frame on one side or both to get the required height. If you followed the boat plans very closely you are already there, however reality is that only happens every now and then. typically you are a little off the mark. If for some reason your frame is higher than the boat plans require, then you need to take the frame down and readjust the temporary cross member so that when mounted it is either perfect or a little low so that it can be shimmed.
In theory, once you have all the frames and transom shimmed up correctly, you should be able to look down the center of the boat skeleton and the center line at the top of the boat should be one right behind the other. Here is where you need to step back and eyeball everything. If something looks wrong it probably is. start by looking at the forward most frame and let your eyes wander back to the transom. follow the center line, and each chine line. the roll of the curve of the bottom should be the same from side to side. With my eyes (which aren't very good), I can typically spot an out of place frame. When I do I always find that when I re-measure it, that I did something wrong. I like to get everything to within 1/16" and if you have been careful to this point, that is not hard to do.
Once all the frames are at the right height, you need to lock in the spacing. I find this is most easily done by taking scrap pieces of plywood and clamps and clamping along the top while I use a measuring stick cut to the right length to place between the frames while I clamp them in place. Because all the frames are spaced equally on this boat I only need one stick. the exception to this was the distance from the stronback to the first frame which was different on the boat plans.
Next I will be putting the keel and keel battons in place.
Attaching the Inner Stem
 There is one more thing to do with those center lines. Attaching the stem is a little bit trickier then the rest of the forms but still not difficult. Somewhere on your boat plans there is some measurement which will tell you how to mount yours. In our plans, it gave us a measurement which allowed us to get ours right. On our boat, the sheer line on the stem is 6" below the strongback deck. Knowing that, the only other thing we needed to know is when it was centered. Remember that the stem is attached to the keel, so once you get the height right, the only other thing left is centering.
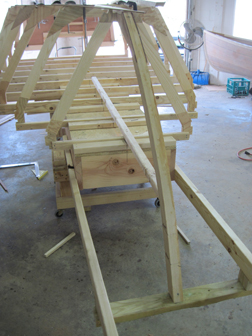
In order to center the stem we used two techniques. First, we attached a straightedge to the center lines of the rest of the hull and marked the center of the stem on the inside. You can see that in the picture to the right. To hold the stem, we extended two 2" by 4"'s from the strongback and as you can see we mounted a cross member from one to the other to set the stem on it. The stem has some waste on the end by design to allow us to mount it.
 Once all this is done you can check your center by simply measuring back from the stem to any of the frames on both sides. If you did this right, the measurement should be the same. When you are convinced that it is right, simply set a screw in the base to hold it in place.
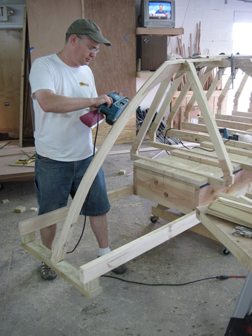
Now that it is place, you need to fair or shape the stem and get it ready to accept planking. If you are a purist, you would use a spoke shave and rasps for this process. I am not and therefore I pull out the power planer and belt sander. from the boat plans you will see the parameters for the shaping which pretty much amount to the amount of stem to leave untouched. The planer makes quick work of this process.
Whats your Angle?
 One of the more frustrating questions I get from aspiring boat builders is where are the bevel angles on the plans? I am not sure who or what company got people to thinking that bevel angles on frame sides is necessary, or even helpful for that matter but perhaps if we talk about this for a second I can keep you from asking the same question. Unless a frame is flat sided with no rake (which would make your boat a tub), the bevel angle will vary along the entire length of the frame. Pretty much all boats flair outward as you go up toward the sheer. This example is compounded even further if you are working on a runabout with curved sides.
There is no CAD substitute for a good eye and a power planer. the idea is to bevel the frame so that if a plank lies on it, it will lie flat and angle toward the next frame. When beveling a frame, remember that one side should not be touched as it represents the outside of the hull at that point. Unfortunately, writing about this process is no replacement for actually seeing it. (We are planning on doing a video of this).
The new "Cool Tool"
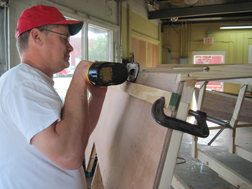
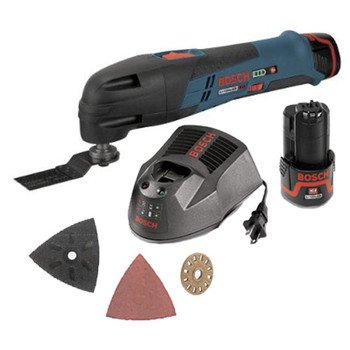 I have to say that I am not a gadget freak. In fact I my idea of a food processor is a good set of knives. However, I have been eying the Fein Multimaster for some time. The only thing keeping me from buying one was all of the internet blogging and complaining about how expensive the blades were. I didn't want to get the gift that keeps on taking. Last week on a leisurely stroll through one of my favorite stores I spotted a cordless version of the tool made by Bosch. Now I am not looking to market the tool for them but let me just say that in the shop, after only a couple of weeks of use, we refer to this as the "Cool Tool". I cannot begin to say how much time this tool saves. When it comes to cutting in chines or trimming off chines, this tool is unbeatable.
So, with that said, lets fit those chines, knuckle and sheer battens
The notches, their sizes and their locations are all described on the plans bust as with all boats, there are angles to cut. The plans can only get you so far, the final fitting needs to be done with a bit of artistry. The trick to this (if there is a trick) is to take it one frame at a time. I like to start near the center of the boat assuming that that is the place where the frames will be flattest. That is to say there will be little or no bevel to them. This allow you to slip the batten in and clamp it down. Now, working forward or backward, simply manipulate the notches so that the batten fits and aims at the next frame.
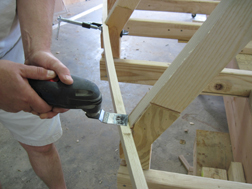 Here is where the cool tools comes in. As you can see from the picture, the batten is clamped in behind me and laying over the next notch. The angle requires me to take about 1/8" off the high end and the opposite low end so that it will angle toward the next frame. Normally this would be a matter of marking lines, taking the batten off and getting a sharp chisel. To do it right it would take about 15 minutes per notch. With the cool tool you simply line the blade up with the top and bottom of the batten and nip away. Total time to success is about 120 seconds (10 frames, 6 notches per frame, you do the math.) By my calculations this little baby saved me hours of work. Most importantly, it did it without loosing any quality. NUF SAID.
The Mother of Invention
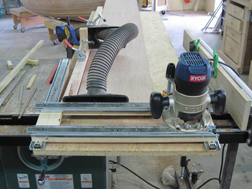 It may be a bit strong to say that the jig I built for scarfing is out of necessity. You can certainly scarf a plank the old fashion way, however being a basically lazy being and having 40 of them to do, I figured it was worth a bit of thinking to see if there was a better way than planing and sanding. I ran through a bunch of designs before Ianded on this one. The biggest problem I faced was a cutting tool that could cut through 8" of wood and make a perfect scarf. Turns out a router with a dado bit was the only tool I could think of that would do the trick. so now the problem was how do Imake the router travel a path left and right and up and down while maintaining the right angle to give me a scarf with an 8 to 1 ratio.
 After a series of missteps, turns out acouple of simple draw slides did the trick.I had to find the right slides, which was not difficult and there were a few other interesting problems to overcome but the endresult was perfect. Once the jig was up and running it took about 4 hours to cut 40 scarf joints. I can tell you from experience that that is extremely fast. Even more impressive was end result. The scarfs were at least as good if not better than any scarf I have ever done.
Don't take my word for it, here is a picture. Take a look and you decide.
Trimming the Transom
 Now that the the keels, keel battens, chines and knuckles are in and all of the frames and stem are trued, there is something left to do before we start putting plywood on the hull. On this boat, and most boats that take an outboard for that matter are mounted at an angle to the rest of the hull. On this boat it is 15 degrees. Because of this the bottom edge of the transom needs to be trimmed to follow the angle of the bottom of the hull. Now we could get out the planer and sander again, but there is a quicker way to get to the finish line.
Using a jig saw and a board clamped to across the hull you can cut from one end to the other. takes a bit of time because you are cutting through almost an inch and a half of wood but with a good sharp blade and patience it will go quickly. Just set the blade to the same angle as the transition from the transom to the keel. You will also have to make sure you have a blade long enough to do the job.
Finally, Time to Plank
 OK, I lied. One more thing to do before we start planking. Just wanted to get your attention. Everyone wants to jump right to the planking.
The last thing we need to do before we actually get to put a plank on the hull is shape the chine and sheer. In the case of this boat there is a knuckle which is 4" below the sheer which we will be planking to. I decided to worry about the sheer plank when the hull is flipped so that it is easier to see and work and will likely get a better outcome.
Shaping the chines is very simple. Particularly on this boat. The chine follows the angle or bevel of the sides already, so the only thing left to do is to get rid of the part which rises over the bottom of the hull so that we can put the bottom planks on. For this I took out the power planer again and finished it off with a belt sander. A knuckle is a little bit trickier though. The boat plans specify a chine at the center of the knuckle so that the side planks and the sheer plank will both land on it. The boat plans also called for the knuckle chine to be parallel with the sheer on this boat. So that means the chine needs to be shaped along the hull so that there is a crease the entire length. This will become apparent once the chine is on the boat.
 Time for this task is about 2 hours, but take your time and get it right. A good smooth and fair curve along the knuckle will greatly help when the time comes to put the planks on.
OK Really, it's time to Plank
Well now that the skeleton is ready to go, it is time to get some planks ready to put on the boat. On this boat as with most hard chined boat building projects, we are going to start on the bottom of the boat. If your boat plans specify something different then by all means, follow the plans.
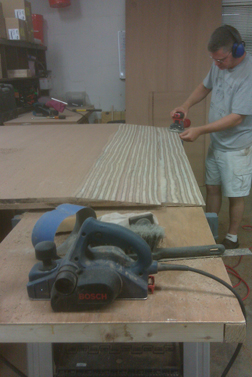
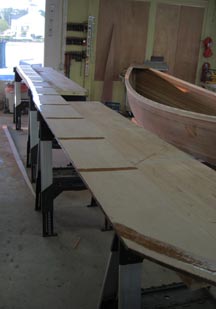
We didn't have a 5' wide by 16' long sheet of plywood hanging around, so the first job for us is to scarf up some planks. We gang scarfed our bottom which is made from 3/4" marine grade plywood. The widest section of our bottom is just about 5' so we started with cutting the appropriate panels. Gang scarfing is simply a matter of lining up the panels so that you can cut more than one at a time. Because we are using 3/4" plywood, our scarf is going to be 6" deep. Doing more than 3 scarfs at that depth for me it too much to handle so I will only be doing 3 at a time.
Pretty much any power tool in the arsenal is fair game for scarf making. Good choices are grinding wheels with course paper, belt sanders for the finishing touches and I find the power planer pretty much invaluable for this process. The old timers will tell you that a good sharp carpenters plane will do the trick and they are right, but for me if they make it with a chord I am pluggin' it in.
There is nothing particularly tricky about making a scarf joint, it is just a task to be done. It is also not something that has to be done in one shot, so if you get tired of it, stop and come back to it again. The scarf joint you see in these pictures was 3 1/2 hours from start to finish. I was defiantly ready to stop when these were done and move on to another boat for a while.
Planking the Bottom
 Well here is where all of that prep work pays off. We put the first two bottom planks on today, took about an hour and a half per panel and everything went as smooth as could be. You just can not overstate the importance of getting to this point. The more attention to detail you put into the set up the easier the build goes. Follow the boat plans!
The plank process is an easy one. Dry fit your first panel by clamping it on the boat making sure the back overhangs the transom and the scarf edge is up. When you are happy with the way that it sits, take a pencil and trace around enough of the chine and keels and battens so that you can take it off and know where everything is. This means you will have to put tick marks on the panel and boat skeleton so that you know where the panel goes back to.
We took the time to pre-drill screw holes and countersinks so that we didn't need to deal with that once the epoxy was mixed.
Our boat plans called for thickened epoxy for gluing up the planks, so we mixed up some epoxy and hardener and painted it on the panel where the trace marks are and the matching supports on the boat's skeleton. Once you have done that mix up some epoxy and thickener such as Cab-o-sil. This mixture gets mixed to approximately a creamy peanut butter consistency. Follow your manufacturers instructions.
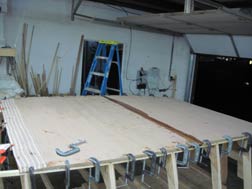 The reason you need to use un-thickened epoxy first is so that the wood does not get glue starved. If yo follow this procedure you will have a very strong bond between the plank and the boat skeleton. The screws are basically there to hole the plank in place. Epoxy does not need heavy or forceful clamping. In fact it prefers just a firm hold down. In fact, as you can see from the pictures the plank is held to the chine by lightly clamping it down. If everything goes well you should have a light squeeze out of epoxy around all the adjoining areas. There will be a tendency for the scarf to want to pull up a sixteenth or so. I recommend putting a screw in the middle of the scarf where it hits the keel and keel battens. Make sure you sink it enough so that the mating scarf will lie flat. The mating scarf will be screwed down as well.
You should most definitely take the time to scrape up all the excess now. If is far easier to do this now than it is when the epoxy dries. This is a job most definitely easier with two people.
Boat Bottom Planked
 The Dory took 4 planks in total on the bottom which is what the boat plans called for and all in all it was uneventful. Because I plan on taking this boat into the surf and beaching it, I chose to use 3/4" plywood on the bottom. It adds only about 100 lbs overall to the weight of the hull but it gives significant rigidity and a lot of extra protection against that rock hidden in the sand. Planking with 3/4" was no more difficult than 1/2" so I don't see any downside here.
Glue was used on the keelson and keel-battens and scarfs. Clamps easily held the planks in place while the epoxy dried. As you can see from the picture, you need to have a bunch of clamps ready. Remember that the clamps are simply to hold the pieces in place. Do not tighten them so much that all the epoxy squeezes out, just a snug turn of the screw will do.
 Because of the depth of the stem, you will need a bar clamp or the like to hold the bitter end of the last plank down to the foot of the stem. I used one of those grip clamps which work OK but you need to have a good grip to squeeze them together.
Before we put any of the planks on the bottom, the boat plans warned us to put them up and rough cut them to shape and this proved to be good advice. It made the final shaping of the bottom a much easier job. Just a few passes with the power planer and some finishing passes with the belt sander and the bottom was pretty much done.
Another suggestion, As you are gluing up panels, take some time before you mix the epoxy to prep areas already planked so that if you have extra thickened epoxy after the gluing is done you can use it to fill any irregularities, or screw holes as you go. this accomplishes two things. First, you won't waste epoxy as it is impossible to mix just what you actually need, and second, the task will have to be done sooner or later so might as well do it as you go.
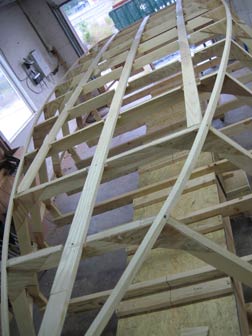
The boat plans call for a deep curve in the bow or entry of the boat which should really make the hull ride well on waves giving it cut and lift. This means that when the planking was done we had to shape the bottom into the stem by following the chine. Easy enough to do but you there is a tendency to flatten out the curve if you aren't careful. If you look at the picture to the right closely you can see the curve I am talking about.
If you added up all the time it took to plank the bottom of the boat once the planks were scarfed, it was about 6 hours or so with two people.
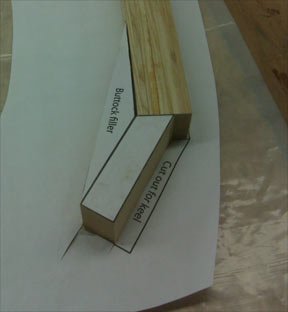
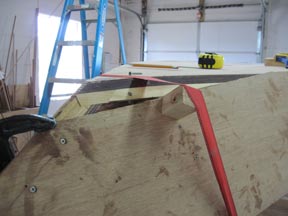
Take a close look at the Scarf Joint
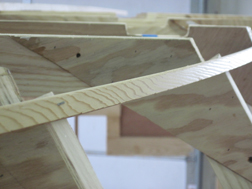
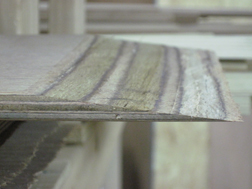
 I realize that for many of you reading this journal, you may never have tried to use a scarf joint before, so I wanted to take a moment to really zoom in on the results of a properly done scarf joint. Once the bottom was planked and the sides sanded down, even though I have done this many times, i was struck by the elegance of the resultant joint. So much so that I took this close up picture from the side so that you could see why people bother to make these joints. If not for the epoxy line on the bottom of the hull you would likely miss even seeing the joint from the side. These joints are not difficult to make, and hard to beat when it comes to strength.
Though the boat plans called for scarf joints you could have used but joints here, however it would have left a water catch on the inside of the boat and typically buttock joints do not bend nearly as well as scarf joints.
I suppose I am writing this simply to drive home the ease and elegance of the joint and encourage you to give it a whirl.
Planking the Sides
 You may have been wondering why we are using this planking method over others such as stitch and glue. there are a few reasons. First, stitch and glue planking does not take well to sharp curves. Second and more importantly, if you ever tried moving around a 20' long by 4' wide plank of plywood while stitching it to other planks of the same size you would probably not even be asking this question. This boat is made for some heavy duty boating with self bailing cockpit. by the time I added back in all of the internal structure to do that I might just as well built it this way to begin with.
Don't get me wrong, there is nothing wrong with Stitch and glue, Cold molding, strip planking or any other number of methods. Most people get hung up on a methodology and you simply need to apply the appropriate technique for the boat you are building and the skills at hand. When you know you will either be working alone or with one or two other people, I tend to avoid the 20' long 2 hundred pound panels of wood.
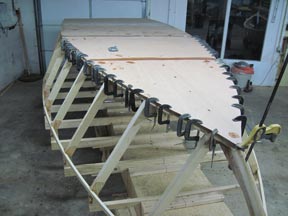
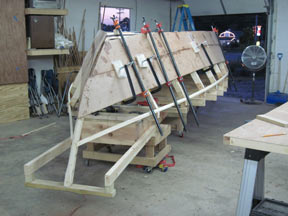
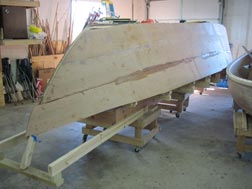
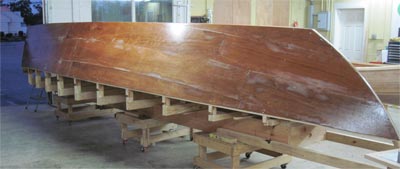
 Planking the sides of the dory happened over a 6 day period. this is largely due to the fact that there were 3 planks per side or 6 planks in total. The boat plans called for planking from 8" to 12" wide, depending on your comfort level. We used 12" planks as this is not the first time for me. There are only two decision points when making up your mind as to what size plank to use. This is not your typical dory skiff. Most dories are built with little or no flair or curves. This particluar Power Dory has flair built into the stem which both cuts into the waves while having lift. this makes for a beautiful and functional entry, however it also requires some definate thinking before you start mixing the epoxy. You can clearly see the curve I am talking about from the picture on the left.
 You will see from the pictures, that we used hold down straps with ratchets, bar clamps and c-clamps to get the job done. Each one was invaluable at its individual task. From the picture to the right, you can see that we used the tie down strap with a block of wood underneath to pull the plank into the curve at the bow. It worked fine, however on the same plank on the other side we notched the block so that it would not slip on the wood as we were tightening up. Each plank applied was epoxied to the frames, stem and where appropriate, the knuckle and bottom. You can see from the first picture that we dry fit the plank first, marked where all the contact points were and painted them with epoxy after we rough cut the shape.
You will also notice the gap at the top of the first plank. Yep, this was a goof on our part. We rough cut the plank along the wrong line and rather than waste a full plank we dropped it down and will fill in the gaps later.
 It is important that when you are rough cutting the planks that you leave a couple of inches on the top that overhang the bottom so that you have a lip to clamp the rest of the planks to. It makes it much easier.
Each plank takes about 1 1/2 hours to put on the boat. What we did was place a plank on the boat and when done, we glued up another plank to have ready the next day to put on the boat. That way we spent about 2 hours a day planking the hull which finishes off the side planking in 12 hours. The boat plans suggest that planking from the knuckle to the sheer may be better done once the boat is flipped so we will do it that way.
After the first couple of planks, the rest was a snap. by using bar clamps between each frame, you can pull up each plank tight and c-clamp the plank in place while you set some strategically placed screws.
Half way through the planking process it became apparent that this hull was rock solid.
Finishing up the Dory Planking
 Finishing up the planking of the hull was a fairly uneventful process and in fact went very easily. I think maybe the only thing I would recomend that is different from what we did is go with a slightly small plank if you don't feel that you are numble with using clamps.
Clamping is the key to a stress free building experience. There are basically three different clamping strategies when planking this boat. you need to clamp so that the plank edges line up. This was accomplished by using deep throat clamps with 8" square blocks of wood covered in plastic. You can see them in the pictrue. The plastic is to keep the wood from sticking to the boat. These clamps are just tight enough to ensure that when you draw the planks together, they will meet on the joints, so they should not be snugged down too tight, just tight enough.
 The second set of clamps goes on the plank where they connect to the frames. Again, these are just to hold the planks firmly against the frames and not for the glue up. So again, they should not be too tight. Lastly, bar clamps set between each frame will easily draw the plank up to its adjoining plank which will give you a nice clean fit all along the 18' boat. Kind of like strip building but on a bigger scale. The entire process was painless and went off without a hitch. The key to the entire planking process is to make sure that the first plank lies naturally, without any buldges or stress. this is most easily accomlished by clamping it in the middle of the boat and working toward each end. Other than the curve in the bow, the plank should lie flat with just a slight pressure. If it does, that means the plank is in a natural relaxed position. If the first plank achieves this, then every plank after that will do the same.
 When using the bar clamps to draw each plank up, you simply tighten enough so that you start to see thickened epoxy squeeze out in the joint. You are not trying to clamp so tight that all the epoxy is pushed out of the joint. In fact that would be a bad thing. The smaller 4" c-clamps are not seen here in the pictures because they are quickly replaced with screws after the plank is drawn in place.
One final note on planking this boat. Becasue it has a knuckel which will facilitate a sheer strake, the knuckel chine needs to be shaped and faired before the last plank is put in place. then blue painters tape is put on the chine on the sheer side to protect it from epoxy while gluing. This is important as the next step will be trimming the plank and you will want to make sure the only thing sticking to the boat is the part that stays.
And, in full disclossure......
You may remember that we goofed when installing the first plank and cut the wrong line on the plank which left a couple of holes on the stem and transome side of the plank. this was easily repaired by fitting a small piece of planking stock in those areas and trimming them off.
Spiling off and trimming the excess plank
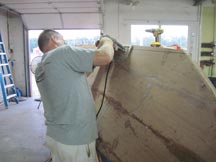 All the epoxy is dry and the hull looks great so it is time to sand and trim and get this boat ready for fiberglass. Nothing tricky about this process unless you have never uses a spiling block before. I believe there is an article on this site on making and using spiling blocks or will be shortly, so if you search you should find it. Spiling is a simple method of tracing a hidden curve or matching one curve to another. In the case of this boat, we need to trace the curve from the Knuckle onto the plank so that we can cut off the excess planking material. It is much simpler to cut it off after the boat is planked than it is to pre-cut the plank. The same method can be used to mark the boat at the bottom chine where the bottom planking meets the side planking.
 Carefully follow the boat plans instructions on where to mark and cut your curve because putting it back on is much harder than taking it off. Most people never consider using a circular saw to cut along a curve, but let me assure you that as long as you are talking about long sweeping curves such as boat profiles, the circular saw is not only a likely candidate, it is the best candidate to get the job done. It took less than 20 minutes to trim all the edges of the planking off the boat.
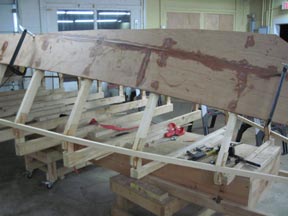
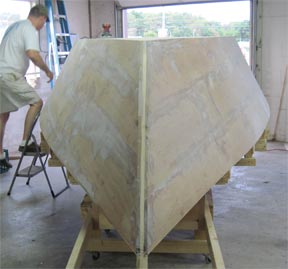
By the way, this is the first "holy cow" moment for me in building a boat like this. There will be more but for me this is the first time I step back and think holy cow!, I like this boat. Once the excess is trimmed off and the hull is sanded down, you will for the first time see the hull as it was intended. Boat plans only go so far in describing the hull.
If you make it this far and can stand back with a smile on your face then you are coasting to the finish line at this point. Pretty much everything from this point on is building on the hull that you just built. If the hull is right the rest is a snap and just stuff to do to get the boat in the water. Getting to this point is just a matter of following the boat plans.
Fiberglassing the Power Dory Hull
 Before we talk about the fiberglass, for those keeping score, we are about 80 hours into the building process, and appear to be on track with the boat plans. In other words, no problems to report yet.
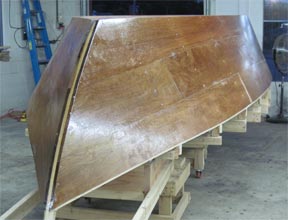
You know you are getting close to the big flip when you are breaking out the fiberglass. For many years boat builders and boat plans stopped here and simply painted the hull. We want this boat to be around for a very long time. So when considering the fiberglass schedule we would use there were a couple of considerations.
First, there are some great beaches around here which will call with a Siren's voice. This boat will undoubtedly be beached from time to time. That means we need good protection from friction on the stem. We also know that this boat will be tied up to a dock for most of its warm weather life. From experience I know that no matter how well you tie up your boat, rubbing from dock to boat is inevitable if the bumpers slip or you are in a particularly choppy slip or a lot of boats are constantly passing by. So for all these reasons and more we will be putting two layers of 10 oz glass on the hull both on the bottom and up to the knuckle. Because of the way that the glass lies, putting two layers of glass on the bottom and sides will put 6 to 8 layers of glass on the front tip of the hull which is more than enough to handle the beaching.
You could if you were so inclined use a single layer of 1708 glass, however it really doesn't add to the structural integrity for our application and it is far more difficult to lay up. Fiber-glassing the boat hull took us 4 sessions at about 3 hours per session to accomplish the whole task. Probably could have accomplished the entire thing in a day and a half if not for the difficulty of working around the wet epoxy. Sometimes it is simpler to just take a breather.

