In the beginning ... Early strip boat plans
 Wood strip boatbulding as we know it has been an evolution over at least 80 years now, though there have been some major mile stones along the way, not the least of which was the Gougeon brothers experimentation and ultimately productization of an epoxy that would give consistent results for boat builders. Likely the biggest boost to the home builder market was a book by a Maine outdoorsman named Gil Gilpatrick simply called "Building A Strip Canoe".
This unpretensious book sparked an enourmous movement in back yard builders. I don't know the original publication date of this book, however my copy has been on the shelf for over 25 years now. The book was the perfect mix of information on how to take a table saw, pile of Cedar and some goo called epoxy and create a way above average looking canoe. The reader simply needed to add a little courage, blind faith and about 100 or so hours worth of elbow grease.
As you may guess, strip buiding predates epoxy. I have spent hours flipping through my considerable collection of boat building books, magazines and plans to see if I could pinpoint with some reasonable accuracy the origins of what we would call wood strip building and what I found was it is a fuzzy starting line. There is an argument to be made that carvel boatbuilding is the strip plank boat building, however without getting too esoteric about it, my goal was to find the origins of using uniform planks with some sort of interlocking profile which reasanably matches the bead and cove used today.
Just when I was ready to give up, there it was. A magazine article with not only a description but illustrations to boot. It happens to be a 15 foot canoe called Gypsy and the article was published in the 1941 edition of "How to Build 20 Boats". the method was considerable different to the methods we use today, however at every variation you can see that the evolution was due to the introduction of technology. things that we take for granted today simply did not exist 60 years ago. The waterproof wood glue that we grab off the shelf, the list of epoxy providers, or even the ability to steam bend a stem piece with a wall paper steamer was all out of the reach of the 1940's boat builder.
With that in mind, the original article is reproduced here and you should read it not with a disregard to the crude methodologies, but with and awe and respect for the early pioneers that pushed for more and more inovations. It is hard to imagine technology that could make it even easier than how we currently build, however I know that I for one am looking forward to trying whatever comes down the pike.
GYPSY - 15' STRIP BUILT CANOE
 You don't have to steam bend any ribs to build this sturdy, light -weight canoe! construciotn is modern and simplified, using waterproof plywood forms. Plans and instructions are clear and easy to follow.
While canoes have always had a greater appeal than perhaps any other type of boat, especially to those who like to hunt and fish, the thought of having to steam and bend in the fifty some odd ribs necessary in their construction discourages most men from attempting to build one. There are no bent ribs in this fifteen footer; edge-nailed strip construction is used with plywood bulkhead moulds; the same type construction as is being so successfully used now aboard even large boats to give all the lightness, strength and grace associated with round-bilged boats without the trouble of steam bending.
Main members are the three moulds or bulkheads with seats attached, the stem and the stern, all of waterproof plywood (Super-Harbord). These are connected by a wide cedar or pine keel, a gunwale and two other stringers each side, and the thin strip planking nailed to each mould, to the stringers, and edge-nailed to each other. The canvas covering finally cemented on bonds everything together, and the gunwales, rub strips, and stem and stern bands complete the canoe. A list of materials required is given; refer to it and the drawings as you read this.
Get out the moulds and the stem and stern first from 1/2-in. Super-Harbord. You can use thicker plywood than this if you prefer, but anything thinner than 1/2-in. is not suitable as it will not give sufficient bearing surface for the cedar strip planking.
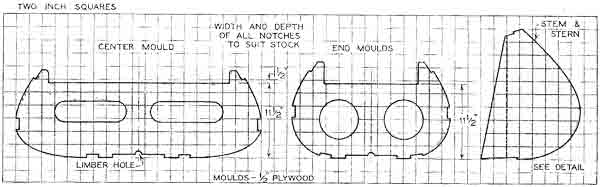
Of course, whatever the thickness, any plywood other than the marine variety will fail miserably even though in this case it is not in direct contact with the water. The mould, stem and stern plan has been ruled off into squares representing 2-in. Use building paper, laying it off in like 2-in. squares and draw in the outlines of the moulds. One must have both sides of a mould alike; the easiest way to do this is to draw one side carefully, then fold the paper exactly along the center line of the mould and use carbon paper or prick through with an awl along its outline, when the pattern is cut out accordingly and transferred to the plywood. Another way is to transfer the pattern for one half of a mould to the plywood, then turn the pattern over to give the other half. Check carefully the dimensions given, 11 1/2", to insure the bottom of the canoe being true, and use one end mould to make its mate; also the stem to make the stern as these too, are alike. In the moulds the cut-outs shown save a little weight but need not be exactly as shown. The notches should be a crowding fit for the bottom board and the other stringers; use pieces of these to determine the depth and width of the notches, having them preferably a trifle shallow and narrow when a shaving can be taken off the pieces to get them in. Do not forget the limbers or drainage notches above the bottom board notch. The plywood stem and stern pieces are reinforced by cheeks of 'VB-in. cedar or pine screw fastened both sides as shown to give the strips better bearing at the ends and permit notching in for the stringers.
A sturdy bulding frame is constructed from cheap 2x4 lumber, as shown. Stem, stern and moulds of the canoe are fastened to this frame, which rests on saw horses. The whole constuction may take place with the canoe upside down on this frame. or it may be righted when half planked if desired. details of stem are in center of the drawing.
Make the building form next: two pieces 2x4-in. 10 ft. long are connected with rough crosspieces 12-in. long. Spike another 2x4, 14 ft. long, beneath this as shown and cut a notch 2-'14-in. wide and 6-in. deep into each end of it the thickness of the made-up stem and stern, which crowd in here. Fasten the seat boards atop the moulds next: these are of 1/2 -in. plywood also, notched out to let the upper shaped ends of the moulds project. Fasten with 1 1/4". No.8 screws through the seat into the mould and reinforce with the 3/4-in, square strips each side into both as shown. Leave the seats 2-in. longer each end than necessary, the excess being cut off later.
Run a line between the stem and stern notches to mark along it the exact center of the building form with other marks 4 ft. 6-in. out toward each end. Set the seat fitted moulds in the positions thus determined, making sure they are in line and exactly square with the center line, then fasten each seat to the form with four screws, two each side of a mould, boring for these, and using round-head Screws which are easiest to remove -in this rather hard-to-get at place when the canoe is to be taken off the form. Fasten the bottom board to the three moulds with four 11/4-in. screws each, Countersinking heads flush and checking distances between moulds as you do this to keep them erect. This bottom board should now be flat: fasten its ends to the stem and stern which are still free in their form slots, .using six screws each end, two into the plywood edge, two into each cedar cheek piece. You will notice a dotted line on the stem and stern pattern; have this on the actual members too, so you can keep it plumb or at least the same distance out each end while you pull the stem and stern down in their notches until both are an inch below the line of the moulds, then fasten with a couple of screws through the form tips into the stem and stern. This gives the ends of the finished boat a slight rake up to make for easier paddling, and as you want to have both ends look alike be careful to have both stem and stern fastened in the same position in their notches.
 Fit the two bottom stringers next-they end a couple of inches beyond the end moulds with two 1 1/4-in. screws into each mould. Then the stringers at the turn of the bilge and finally the gunwale stringers, the two latter sets screw fastened into the stem and stern; I-in. screws will be long enough here as they must be countersunk slightly to permit planing off the ends of the strips to let the planking hug the stem and stern. It will be noticed that the gunwale stringers hug the top of the center seat but are slightly over the other ones. Screw fasten from the bottom of the center seat into the gunwale strips with four 11/4-in. screws each end and fit blocks to fill spaces between other seats and the stringer. Fasten up into these from beneath also, having the outer surface of each block flush with the outside of the gunwale stringers so when planking you can fasten into these to tie seats in place. Excess ends of the seats can now be sawn off flush with the gunwales so they will rest up against the planking as it is put on. All the while •you are fastening the stringers in place make sure the moulds are not getting out of true but are being kept plumb as the shape of the completed canoe is naturally dependent on the trueness of the frame.
You will notice in building this upside-down way fastenings such as those through the seats into the stringers go in from above in an easy to get at way, hut are out of sight when the canoe is turned over in use.
Before commencing planking go over the entire frame to see if the bottom boards or the stringers are projecting beyond the edges of their moulds-it is usually necessary to take off a shaving here and there along their edges to permit the planking fitting tightly and being nicely rounded. Side and gunwale stringer notches into the end moulds should have been beveled to allow for these stringers making in toward the stem and stern and the end edges of these moulds should be beveled now to match.
 Full-length strips of any easily nailed wood can be used for planking: the lighter the wood used, such as cedar, the less the canoe will weigh. 1/4"x 1 3/4". lattice can be used, strips being ripped in half at the mill to make them narrow enough to permit edge nailing. If stock must be gotten out specially have strips slightly thicker, 3/8", to make for easier nailing. A good way is to have the mill set their saw to cut 1/2". strips from wide 3/4" thick boards then run one side through "a planer to finish 3/8". thick. The other side can be left rough as the outside of the canoe must be sanded flush after planking anyway, and there is no advantage in having the edges of the strips dressed. A much better job can be done by having a can of liquid marine glue handy to paint the bottom board, the edges of the moulds and the stringers as you come to them while planking. Run the first strip down the center then work out from it to plank alternately a few strips each side. If one side is entirely planked first the framework is apt to be twisted out of true. Use very thin galvanized wire nails, either finishing nails or with a head, 3/4-in" long into the bottom board and stringers, 1 1/2". long into the moulds and through the edges of each plank 6-in. apart into the preceding strake. The fact that the canoe has greater girth measured around the center mould than around the end moulds with still less toward the stem and stern complicates planking just as it does with any round-bilged boat. The correct way is to taper every strip from full width in the center to 1/2-in. wide at each end to allow for this. Another way is to taper the first dozen strips on the bottom each side to 1/4-in. at the ends, then lay the next dozen full width, but to taper remaining strips sufficiently to fill in the space left. Fasten into the stringers as you come to them to afford additional strength, having heads of all nails perfectly flush with the surface or the wood, Splitting can be avoided by allowing the ends of the planks to project beyond the stem and stem until a few strips are on , then saw all off in line with the plywood there. With the canoe planked go over the entire surface with coarse sandpaper on a block rubbing across the strips to take off any corners or irregularities which might show through the canvas. Round the stem and stern ends so they will not cut the canvas when you pull it across there, The canvas goes on in the usual way; the size specified is wide enough to cover the canoe in a single piece making joining unnecessary. This rather wide width can be secured from any marine hardware house.
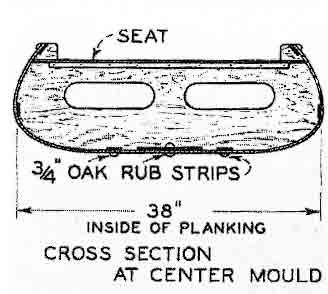 Moulds are of half-inch super hardboard marine plywood and constitute pricipal strength members of hull. the holes in the moulds may be cut to whatever size and shape desired as long as they are not large enough to weaken the plywood.
Strike a center line down the piece of canvas, paint the hull with canvas cement, then lay the canvas in this and drive a row of 1/4-in. copper or galvanized tacks along the center line to hold it while you stretch it toward the gunwales to fasten it there with tacks 2-in. apart. Pull the canvas down and forward as you go until you reach the curve of the stem or stern where you will have to cut out a V -shaped piece to pull one side over and. tack it in plenty of cement. Then smear the edge with cement and pull the other side over to tack it. Your tack heads should be placed so they will later be covered by the stem and stern trim and by the half-round gunwale strips and bottom keel. Screw fasten the trim, setting all in cement, then trim off excess canvas along the gunwales and at the bow and stern. Finish with two thin coats of deck paint sand when well dry, and complete with a single coat of canoe enamel the desired shade.
The canoe has been left on the form until now as this is the easiest place to work on its outside. To get it free reach up from beneath to saw off the projecting 2x4's holding the stem and stern' and take out the screws holding the seats to the form. The remaining pieces of the 2x4 can be split out and their fastenings removed once the canoe is off the form, and the screw boles through the seats filled with plastic wood.