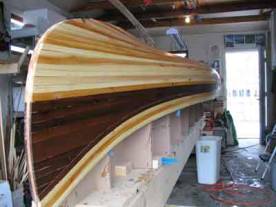
Relief and Filler Strips
“THE COST OF THE CURVE”
 Those who know me well have heard me say at one time or another that “nothing in life is free”. This is particularly true in some of the design decisions of boats. At the risk of getting myself ostracized from the boating community, I would rather be up front with a prospective builder and tell them the positives and negatives of a design even at the risk of loosing that customer. You will, at a minimum, give up a good number of weekends to build your boat, and depending on the boat you may spend hundreds of hours building. Although I stick by my philosophy that the building of the boat is an important and enjoyable part of the journey, you as the builder have every right to know where that journey will take you.
Generally speaking, hulls that are full right to the stem are uneventful during the stripping process and the use of accent strips are optional and to taste. Though I am a fan of using different colors and variants of grains to enhance the aesthetics of a strip built boat, this writing is more about using strategically placed strips because the shape of the hull calls for them. In the stripping of a hull, there may come a point where the compound nature of the transition of curves from the main body of the hull to the stems may call for a strategic decision to use relief strips.
I named this article “The Cost of the Curve” because it is typically hulls that show a pronounced stem section, which will require relief and filler strips. What that curve gives you on the other hand is typically a boat that cuts the water and as a result tracks better when paddling. Two good examples of this are the “Adirondack Guide Boat” and the “Companion” canoe.
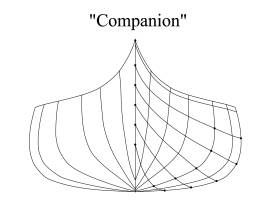 In the forms view of “Companion”, you can see that as the strips approach the bow and stern they not only have to change from horizontal to vertical, they also have to curve up to follow the sheer line. This is known as a compound curve.
Alternatively, boats with fuller stems will generally not need relief strips unless the stem sweeps up so much that it may ease the stripping process. A good example of a canoe with a full stem is the “Prospector” canoe. In the forms view of “Prospector”, you will note that the forms are fuller in the stem and the sweep of the sheer line is also less severe. Both of these design elements greatly reduce, and in this case eliminate the need for relief strips. On this boat, varying from simple stripping is for aesthetics.
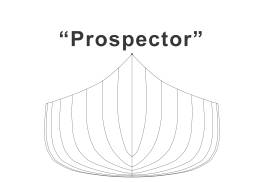 In general, canoes or boats with fuller stems tend to not cut the water or track as well. That by no means implies the boat is of an inferior design. On the contrary, the stem is a design tool just like “rocker” and “tumblehome”. During the design process a number of these tools are combined to produce a hull, which hopefully fills the design objective.
For example, the “Prospector” has a fuller stem than the “Companion” canoe. As I said, this means “Prospector” will not track as well as “Companion”. When you consider that “Prospector” also has a good bit more tumblehome and rocker than “Companion” it begins to show the original design philosophy of the boat. So lets add it up. A fuller stem, rocker, and tumblehome generally means that we are looking at a hull designed primarily for running on rivers. It should therefore not be a surprise to hear that “Prospector” excels at doing just that. Conversely, because it is so good at running moving water, it is not so good at paddling across a large calm lake, particularly if you are paddling alone with any kind of a wind.
 Now lets consider “Companion”, a hull with a decidedly more defined stem and aggressive transition from hull to stem. This boat also has almost no rocker at all and tumblehome is provided specifically for the purpose of leaning into a turn without tipping. Because of the tracking capabilities of the hull, it would definitely not make for a good canoe on a fast running river as it wants to stay straight. When you are heading down a river and a large rock appears ahead of you, it is important to be able to pivot or change directions of the boat fast and you don’t want any arguments from the boat while you are trying to do so.
Now that we understand why we sometimes need relief and filler strips, lets take a look at how we can accomplish that.
If you feel that the turn is getting too difficult, you can overcome this by starting the next strip in the middle of the boat up against the strip before it and instead of curving the strip around the forms keep the strip level to the floor from end to end. This will leave a gap to be filled and each strip will have to be individually cut to fit.
Making this gap does a couple of things. First, it will eliminate or greatly reduce the curve in one direction leaving only the sweep to the stem or the change of direction from horizontal to vertical to worry about. This for the most part will depend on how you decide to fill the gap.
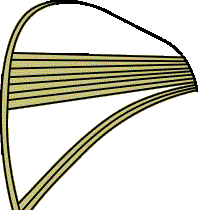
Example One:
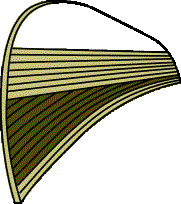 You may decide to fill the gap by using relief and filler strips, which follow the curve of the sheer. Typically, this is the more time consuming method because where the strips meet they become thin and curved on both the bead and cove edge which will require you to make the curve and then restore a bead and cove to mate with the contacting strips. This can be done with a sander for rounding over the bead and a small ¼” round file for the cove. If you have the patience, this will result in a very good-looking stem.
Example Two:
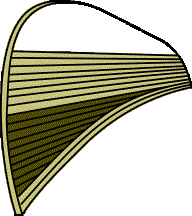 An alternative method would be to follow the horizontal strips and not the sheer line. This is a more straightforward method and most find this easier to accomplish. It is important in this method to ensure that you keep each strip parallel to your horizontals, as variances will show themselves. This should not be difficult to do as long as you keep the strips tight to each other.
Example Three:
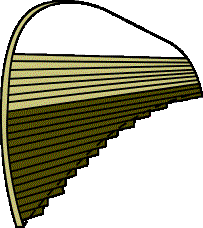 Outset of stripping, you can decide to keep a horizontal look to the boat. added for a guide to the rest of the strips without being seen because the Although the picture shows no sheer strip, in reality a sheer strip can be added for a guide to the rest of the strips without being seen because the gunwales will cover it up. Adding a sheer strip to this method is a land preference for you to decide. Where it makes it easier to decide where to land the strips, it also requires you to fit every strip to the sheer strip. Not using the sheer strip means the stripping will go faster because you don’t have to fit every strip and the sheer can simply be sanded or planed will when the gunwales are fit. The negative to not using a sheer strip is you will have to make sure that all your strips are conforming to the hull with nothing to land them on. If you are a first timer and not comfortable with the stripping process, you may want to consider using the sheer strip of relief and filler strips.and putting in the extra time fitting the strips. Below are some examples of relief and filler strips.

